Note
This tutorial is a continuation of Getting Started With Docker. Please complete that tutorial prior to doing this one.
Getting Started with Nextflow
Tutorial Goals
Learn about Nextflow
Create a basic Nextflow Workflow which uses a Docker image
Run the Workflow locally
Describe a sample parameterization of the Workflow
Push the Workflow onto GitHub
Describe Your Workflow with Nextflow
Important
Since there is no concept of Nextflow as a tool, we will register BAMStats as a workflow. To learn about what a workflow is, see Getting Started With Dockstore Workflows. Once you are done that page then come back here.
Nextflow is a bit different from CWL and WDL. Instead of having one type
of descriptor file, dockstore uses two different kinds of files: A
config file, nextflow.config and a descriptor file, often,
main.nf.
Configuration File
The nextflow.config file is used to store configuration information,
such as Docker image and memory required to run. Below is the config
file for our BAMStats workflow. The config file groups together similar
information and settings within scopes, such as manifest and docker.
manifest {
    description = 'Generate some stats on a BAM file'
    author = 'Andrew Duncan'
}

params {
    bam_input = 'rna.SRR948778.bam'
    mem_gb = '4'
}

process.container = 'quay.io/collaboratory/dockstore-tool-bamstats:1.25-7'
docker {
    enabled = true
    docker.runOptions = '-u $(id -u):$(id -g)'
}
The manifest scope includes high level information about the tool. In this case we have a description of the tool and the author name. Note that we use the author and description fields to populate metadata on Dockstore.
Note
If no description is defined in the descriptor file, the README from the corresponding Git repository is used.
manifest {
    description = 'Generate some stats on a BAM file'
    author = 'Andrew Duncan'
}
The next section is the params section. Here we define parameters
required by our workflow, including the memory in GB needed and the path
to the input BAM file. Note that we can override these parameters
directly in the main.nf file, or on the command line using the
format --parameter_name parameter_value.
params {
    bam_input = 'rna.SRR948778.bam'
    mem_gb = '4'
}
We next define the Docker container used in the process scope. Note that we do this differently than the other fields. This is another valid syntax for setting values within a scope.
process.container = 'quay.io/collaboratory/dockstore-tool-bamstats:1.25-7'
The last scope of the file is the docker scope. This scope does not define the container that we use, instead it defined other Docker related configurations. Note that we have to specify that we want Docker enabled. Just setting the process.container is not enough!
docker {
    enabled = true
    docker.runOptions = '-u $(id -u):$(id -g)'
}
There are many more scopes and options within the scopes. To learn more see the official documentation.
Descriptor File
The main.nf is similar to the Dockstore.cwl and
Dockstore.wdl we used for CWL and WDL respectively. It includes a
description of a tool, including the inputs, outputs, and command run.
Below is the main.nf file for BAMStats.
#!/usr/bin/env nextflow
nextflow.enable.dsl=2

bamFile = Channel.fromPath(params.bam_input)
mem_gb = params.mem_gb

process bamstats {
    input:
    path(bam_input)
    val mem_gb

    output:
    path('bamstats_report.zip')

    """
    bash /usr/local/bin/bamstats $mem_gb $bam_input
    """
}

workflow {
    bamstats(bamFile, mem_gb)
}
First we tell Nextflow that the bam_input parameter is a file. We do this outside of the process.
bamFile = Channel.fromPath(params.bam_input)
Next we will look at the process scope. It is made of the input, output and command sections.
In the input section we define the input bam_input as a file from the object bamFile. We also define the input mem_gb to be the value of the parameter mem_gb.
input:
path(bam_input)
val mem_gb
We then define the output of the process as the file
bamstats_report.zip. Note that we do not do anything with this
output. If we were to have a multi process workflow, where another
process depended on this output file, we would have to do more to setup
that connection. However, this is not within the scope of this tutorial.
output:
path('bamstats_report.zip')
The final section is the command section. This section defines what command is run by the process. We run the bamstats command line tool and pass it the mem_gb and bam_input parameters that we define in the input section of the process.
"""
bash /usr/local/bin/bamstats $mem_gb $bam_input
"""
Testing Locally
Note
As of 1.5.0 you cannot run Nextflow workflows from the CLI. Instead you must run them directly from the Nextflow command line tool. The only drawback of this is that it does not support Dockstore file provisioning. It does have its own form of file provisioning, but we will not go into that here.
So at this point, you’ve created a Docker-based tool and have described how to call that tool using Nextflow. Let’s test running the BAMStats using the Nextflow command line and descriptor rather than just directly calling it via Docker. This will test that the Nextflow correctly describes how to run your tool.
First thing I’ll do is create a completely local dataset and update the configuration file:
$> wget ftp://ftp.1000genomes.ebi.ac.uk/vol1/ftp/phase3/data/NA12878/alignment/NA12878.chrom20.ILLUMINA.bwa.CEU.low_coverage.20121211.bam
# alternative location if the above URL doesn't work
$> wget https://s3.amazonaws.com/oconnor-test-bucket/sample-data/NA12878.chrom20.ILLUMINA.bwa.CEU.low_coverage.20121211.bam
This downloads to my current directory. I could choose another location,
it really doesn’t matter. We then must update the nextflow.config
with the new file.
manifest {
    description = 'Generate some stats on a BAM file'
    author = 'Andrew Duncan'
}

params {
    bam_input = 'NA12878.chrom20.ILLUMINA.bwa.CEU.low_coverage.20121211.bam'
    mem_gb = '4'
}

process.container = 'quay.io/collaboratory/dockstore-tool-bamstats:1.25-7'
docker {
    enabled = true
    docker.runOptions = '-u $(id -u):$(id -g)'
}
Now we just need the Nextflow CLI to run the tool. Assuming you have Java 8+ installed, run the following command to install Nextflow.
curl -s https://get.nextflow.io | bash
We recommend that you add this command to your PATH so that you can run it from anywhere.
We can now run the tool with the following command
$> ./nextflow run main.nf
N E X T F L O W  ~  version 0.31.0
Launching `main.nf` [voluminous_dubinsky] - revision: 5a7f382891
[warm up] executor > local
[c4/6f9ebf] Submitted process > bamstats
The logs for the tool run will be visible in the .nextflow.log file in
the current directory. It specifies the working dir of the tool and
where we can find the output. In our case the output was stored at
work/c4/6f9ebfe4e2c30d9685cf3cfbbf7643/bamstats_report.zip.
Adding a Test Parameter File
Nextflow does not have the concept of a test parameter file. Instead you
either pass parameters on the command line when you run it, or you can
specify parameters in the nextflow.config or main.nf.
Releasing on GitHub
At this point, we’ve successfully created our tool in Docker, tested it,
written a workflow language descriptor that describes how to run it, and
tested running this via the Dockstore command line. All of this work has
been done locally; so if we encounter problems along the way, it is fast
to perform debug cycles. At this point, we’re confident that the tool is
bug free and ready to share with others. It’s time to release
1.25-6_1.1
Releasing will tag your GitHub repository with a version tag so you can
always get back to this particular release. I’m going to use the tag
1.25-6_1.1 which I’ll need to update the Docker image tag in
my CWL/WDL/Nextflow file. Note that if you’re following the tutorial
using a forked version of the bamstats repo, your organization name
should be different. GitHub makes it very easy to release:
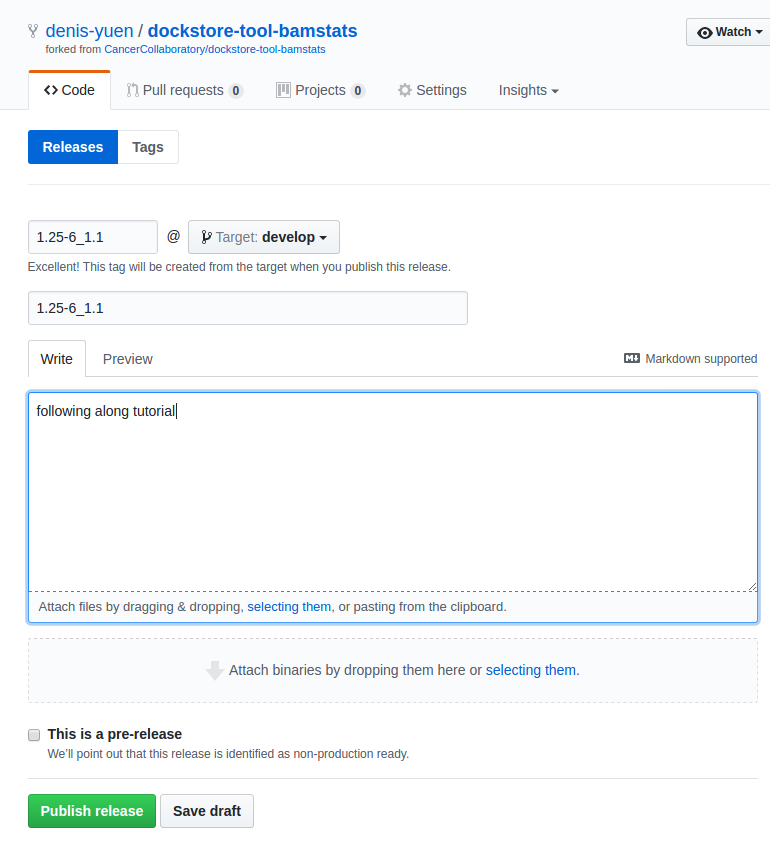
Release
I click on “releases” in my forked version of the GitHub project page and then follow the directions to create a new release. Simple as that!
Building on Quay.io
Now that you’ve perfected the Dockerfile, built the image on your
local host, tested running the Docker container and tool packaged
inside, and have released this version on GitHub, it’s time to push the
image to a place where others can use it. For this you can use Docker
Hub or GitLab but we prefer Quay.io since it
integrates really nicely with Dockstore.
You can manually docker push the image you have already built but
the most reliable and transparent thing you can do is link your GitHub
repository (and the Dockerfile contained within) to Quay.io. This will
cause Quay to automatically build the Docker image every time there is a
change.
Log onto Quay.io now and setup a new repository (click the “+” icon).
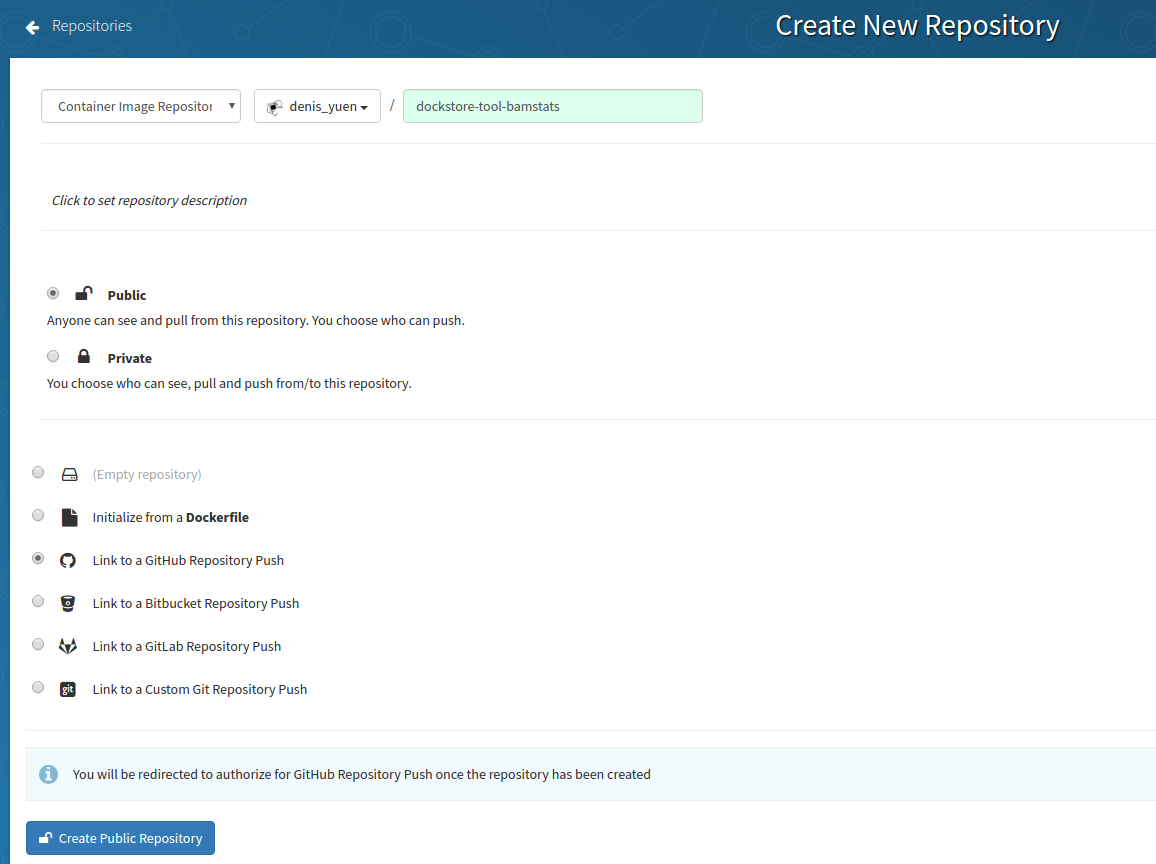
New Quay Repo
For your sanity, you should match the name to what you were using
previously. So in this case, it’s my username then the same repo name as
in GitHub denis-yuen/dockstore-tool-bamstats. Also, Dockstore will
only work with Public repositories currently. Notice I’m selecting
“Link to a GitHub Repository Push.” This is because we want Quay to
automatically build our Docker image every time we update the repository
on GitHub. Very slick!
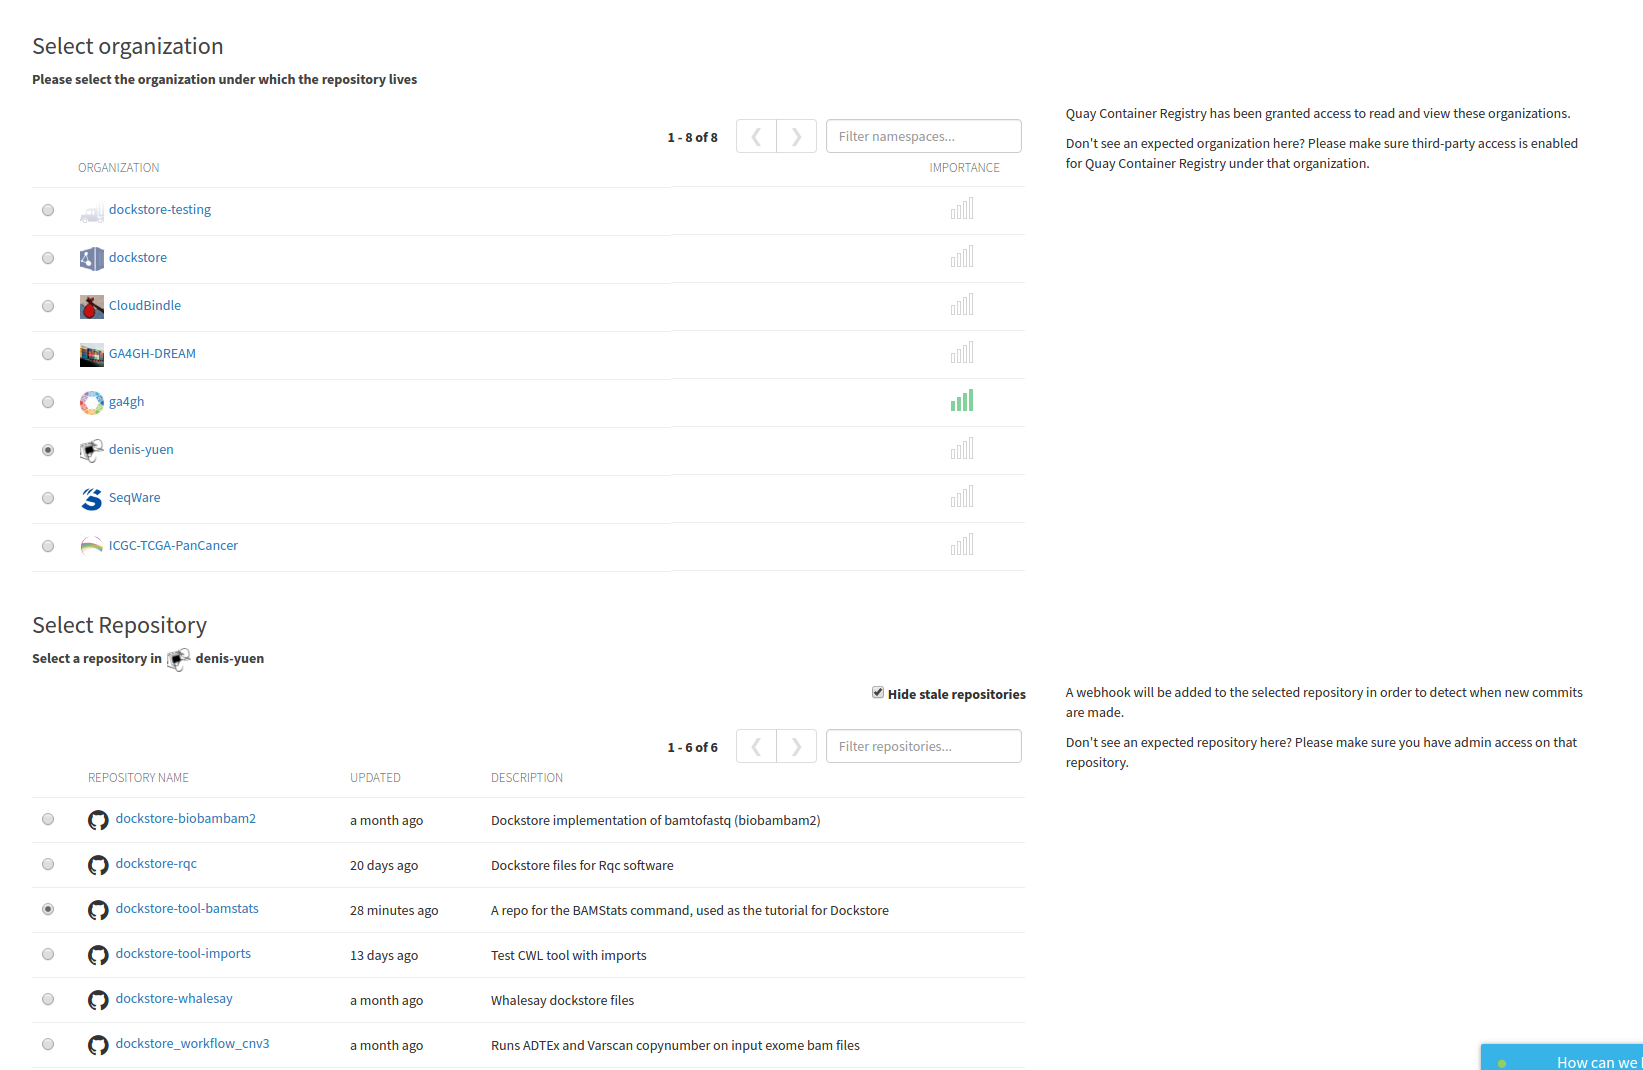
Build Trigger
Click through to select the organization and repo that will act as the
source for your image. Here I select the GitHub repo for
denis-yuen/dockstore-tool-bamstats but this should be the username
or organization you used in your tutorial run-through.
It will then ask if there are particular branches you want to build; I typically just let it build everything.
So every time you do a commit to your GitHub repo, Quay automatically builds and tags a Docker image. If this is overkill for you, consider setting up a regular expression to trigger builds at this step.
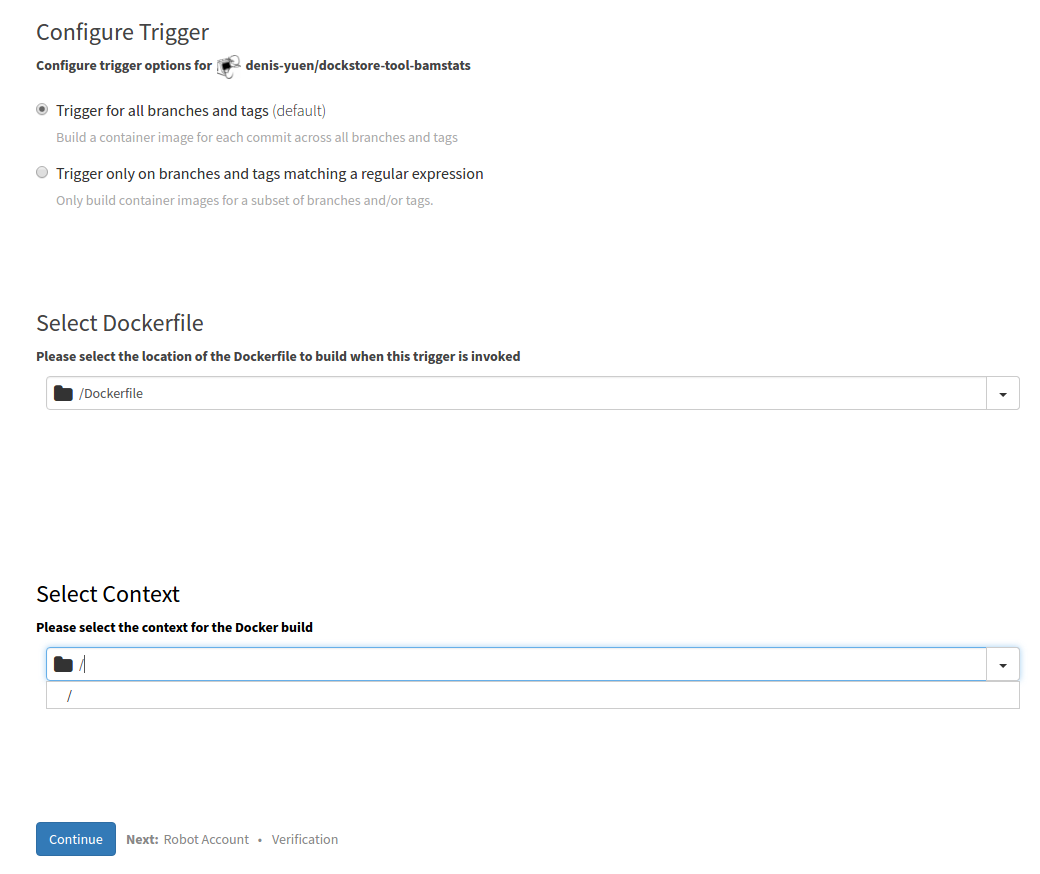
Build Trigger
It will also ask you where your Dockerfile is located and where your build context is (normally the root).
At this point, you can confirm your settings and “Create Trigger” followed by “Run Trigger Now” to actually perform the initial build of the Docker images. You’ll need to click on the little gear icon next to your build trigger to accomplish this.
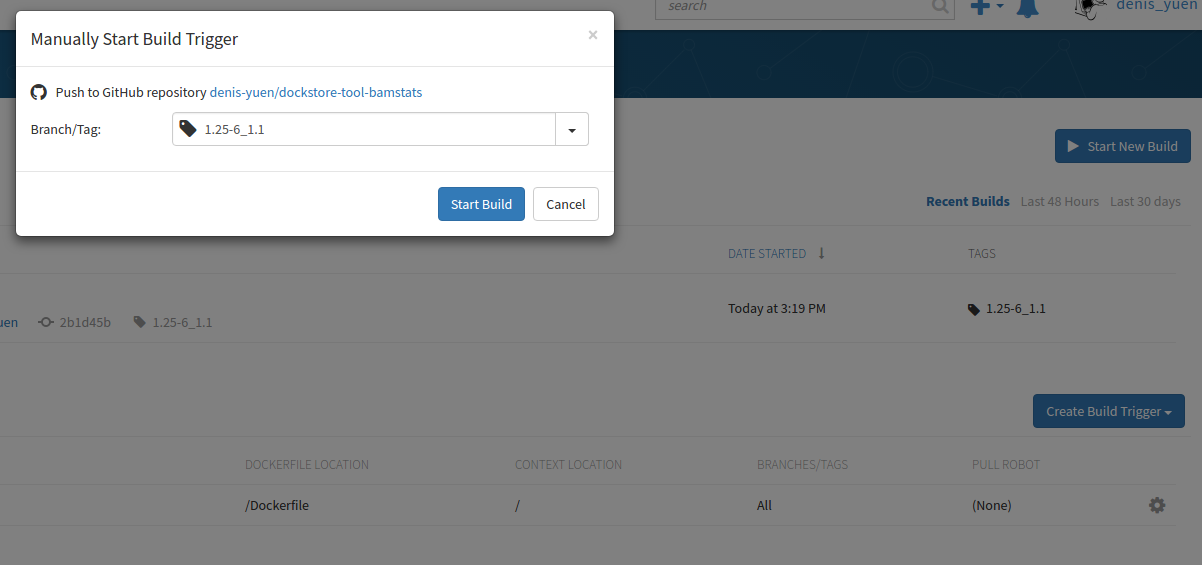
Manual Trigger
Manually trigger it with a version name of 1.25-6_1.1 for this
tutorial. Normally, I let the build trigger build a new tag for each new
release on GitHub. “latest” on Quay.io is built any time I check-in on
any branch. This can be useful for development but is discouraged in
favour of a tagged version number for formal releases of your tool.
In my example, I should see a 1.25-6_1.1 listed for this Quay.io
Docker repository:
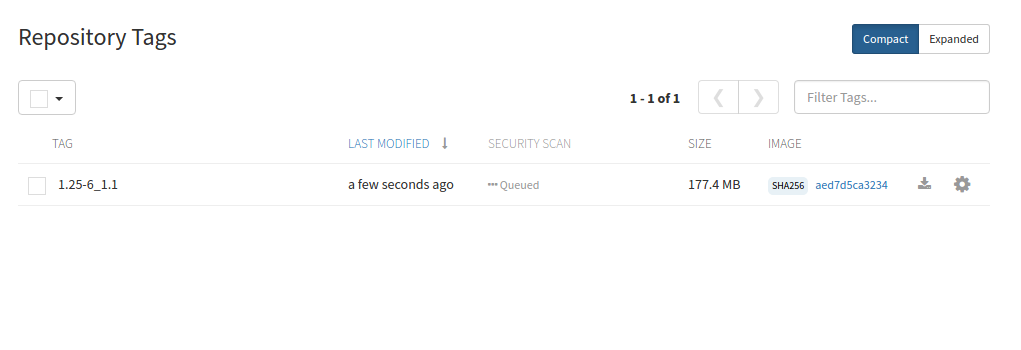
Build Tags
And I do, so this Docker image has been built successfully by Quay and is ready for sharing with the community.
Next Steps
Follow the next tutorial to create an account on Dockstore and link third party services.