Checker Workflows
Tutorial Goals
Learn about checker workflows
Add a checker workflow to an existing tool or workflow
Update a checker workflow
Launch a checker workflow
Overview of Checker Workflows
Checker workflows are additional workflows you can associate with a tool or workflow. The purpose of them is to ensure that a tool or workflow, given some inputs, produces the expected outputs on a platform different from the one where you are developing.
Below is a visual overview of how a checker workflow looks.
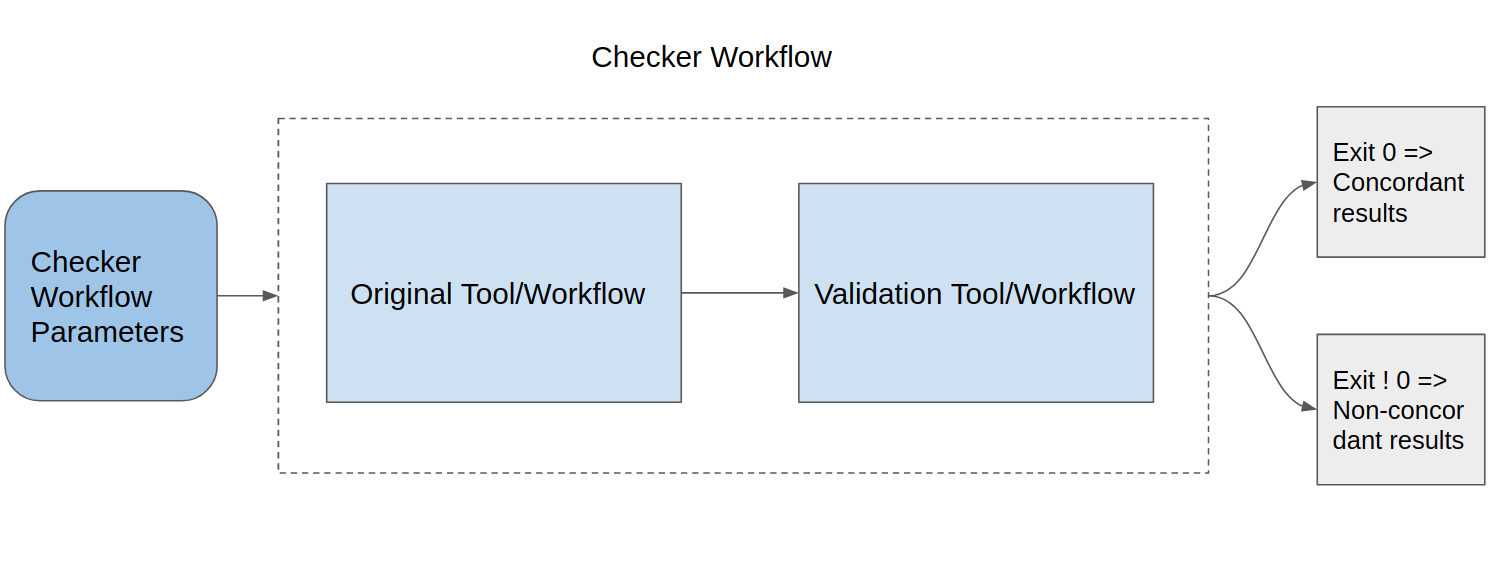
Checker workflow layout - note that the checker workflow “contains” the workflow that is getting tested
The term “entry” will be used as a generic term to refer to both tools and workflows. The entry that a checker workflow is testing will be referred to as the parent entry.
For this example, we will be registering a checker workflow to test a parent entry that calculates the MD5sum of a file. The relevant tools and workflows for both CWL and WDL can be found in the following Git repository: https://github.com/dockstore-testing/md5sum-checker
Although the next sections of this document will focus on just the CWL for the sake of simplicity, the same logic applies to the WDL. A table of the WDL and CWL counterparts follows.
File Type |
CWL |
WDL |
|---|---|---|
Parent input parameter |
/md5sum/md5sum-input-cwl.json |
/md5sum/md5sum-wdl.json |
Parent descriptor |
/md5sum/md5sum-tool.cwl |
/md5sum/md5sum-workflow.wdl |
Checker input parameter |
/checker-input-cwl.json |
/md5sum-wdl.json |
Checker-wrapping descriptor |
/checker-workflow-wrapping-tool.cwl |
/checker-workflow-wrapping-workflow.wdl |
Checker descriptor |
/checker/md5sum-checker.cwl |
/checker/md5sum-checker.wdl |
Quick overview of structure
Like regular workflows, a checker workflow can describe an example input from an input parameter file. The checker workflow can either use the input parameter file for the parent entry, or it can define its own. The second case is useful when the validation tool/workflow has some extra parameters not required by the parent entry, such as an expected md5sum or an output file to compare against.
For our example the second case is used. The parent tool has the input parameter file md5sum-input-cwl.json. This is the file that runs a particular example with the parent entry.
{
  "input_file": {
        "class": "File",
        "path": "../md5sum.input"
    }
}
The checker workflow has the input parameter file checker-input-cwl.json. This is the file that we would pass to the checker workflow to ensure that our parent entry is working properly when we run it with the input file mentioned above. Again, in some cases this file could be the same as the one for the parent entry’s parameter file, though not in this case.
{
  "input_file": {
        "class": "File",
        "path": "md5sum.input"
    },
    "expected_md5": "00579a00e3e7fa0674428ac7049423e2"
}
Notice that the checker parameter file has the same content as the parent parameter file, in addition to having a checker specific parameter.
Recall that the checker workflow refers to the workflow that connects the parent entry with the validation tool/workflow, so that it can be run as one workflow. The validation tool/workflow is what does the actual validation. It is responsible for ensuring that the results of the parent entry match expected results.
To restate: First, the parent entry – the workflow or tool we want to check – is run on a known input. Then, a validation workflow runs on the outputs of the parent entry, and makes sure that they are valid. Sometimes this means comparing a known md5sum, but other methods may be more appropriate, especially if some level of randomness comes into play in the parent entry’s outputs.
Output of checker workflow
To ensure that checking a checker workflow’s output can be automated, it is important that the checker workflow produce consistent exit codes. We require using an exit code of 0 for success and an exit code of not 0 for failures.
We also recommend checking the stderr and stdout logs. The exact filenames of these logs will vary depending on the platform and the workflow language. In CWL, they are typically referred to as log.stderr and log.stdout. WDL executors on the other hand tend to name these files stderr and stdout with no extension.
Note on CLI usage
As mentioned before, the term “entry” will be used as a generic term to refer to both tools and workflows. For existing dockstore commands (tools and workflows), entry refers to the path of a specific tool or workflow. For checker workflows, entry refers to the path of the parent entry. It does not refer to the checker workflow’s path.
Creating a checker workflow
Checker workflows are generally easy to create. First of all, if you wish to create a workflow that is based on comparison to truth files and/or truth file md5sums, you will need to generate truth files for your parent entry. You will then need to create the validation tool or workflow. Finally, combine the parent entry and the validation workflow or tool into one entity – this will be your checker workflow.
Truth files
A truth file represents the output of a parent entry for a given input. For example, if your parent workflow should always output file named NWD2042242.txt containing the string “NWD2042242” when passed NWD2042242.crai, then your truth file is a file named NWD2042242.txt containing the string “NWD2042242”. Now, if you run that same workflow with the same input, but end up with a different output (such as the string being “NWD2042242NWD2042242”), you know something has gone wrong because that output does not match the truth file.
You will likely one at least one truth file for each important workflow-level output
file. You can even create multiple truth files for each output so you can test more
than one configuration. Reusing the same example as before, if setting a workflow input
boolean reverseoutput to true results in your output file being named 2422402DWN.txt
instead of NWD2042242.txt, you may wish to create a truth file for that case too. Then,
you can run your parent workflow twice – once with reverseoutput set to true, and once
where it’s set to false – then validate both outputs during your verification step. In
this way, checker workflows can act not just as a way to check basic reproducibility across
different platforms, but become more robust and may fit into a larger picture regarding CICD.
Of course, what is appropriate for your tool or workflow will depend entirely upon its outputs,
use case, and your own preferences for testing.
Validation tasks
You may wish to have your checker validation task check an array of files against another array of truth files. Alternatively, you may wish to check just a single file against an md5 sum string, or another file. Perhaps a more complicated workflow may use both of these approaches. Two examples of validation tasks are presented in this template repository.
Exactly what is considered a “match” or how to do the validation can vary, especially if your workflow or tool involves random sampling or includes timestamps. In such situations an md5sum comparison is usually not the best choice. You may wish to go through files line-by-line, compare RData outputs within some amount of tolerance with an Rscript, count the number of output files… it is important to adjust your validation steps to the needs of your parent tool or workflow.
Putting it all together
In order to run your parent entry as closely to a “real” run as possible, it is usually recommended to use imports in your checker workflow. Not all backends support imports though, so you can also simply copy-paste the parent workflow or tool into your checker workflow. As for your validation tasks, you can likewise import them, or put them in the workflow/tool file directly.
For examples and templates for writing both validation workflows and checker workflows, see this repository. It is focused on WDL, but the same concepts apply to other workflow languages.
Adding a checker workflow to Dockstore
Currently, you can add checker workflows to existing tools and workflows through the UI and CLI.
From the UI
For this example, it is assumed that you are familiar with the process for setting up tools and workflows on Dockstore.
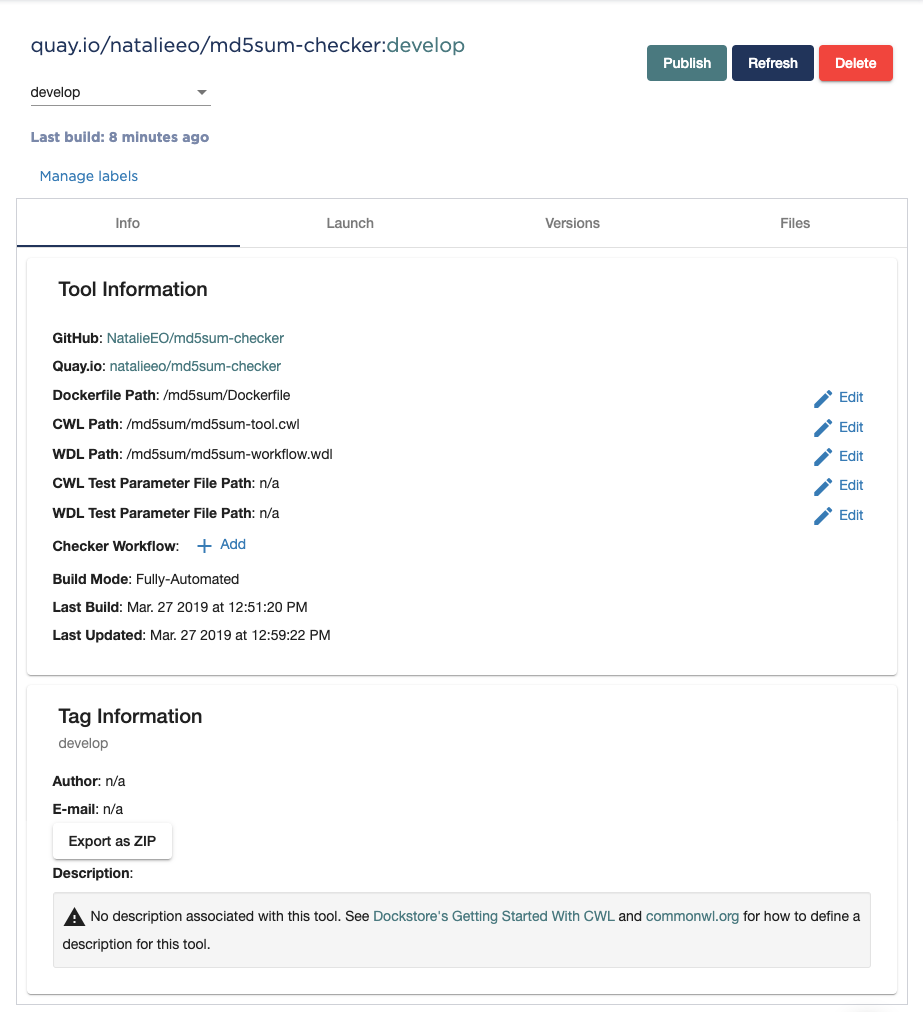
Let’s add a checker workflow for the tool described by /md5sum/md5sum-tool.cwl in the git repository. I already have the tool properly set up on Dockstore.
The first step is to find the tool under the my tools page. In the info tab there is an option to add a checker workflow. Click on the add button.
Adding a checker workflow
When registering a checker workflow, you need the following fields:
Default checker workflow path (path to main descriptor of the checker workflow)
Default test parameter file (if not given will copy over from parent entry)
Descriptor type (CWL or WDL), if parent entry is a tool
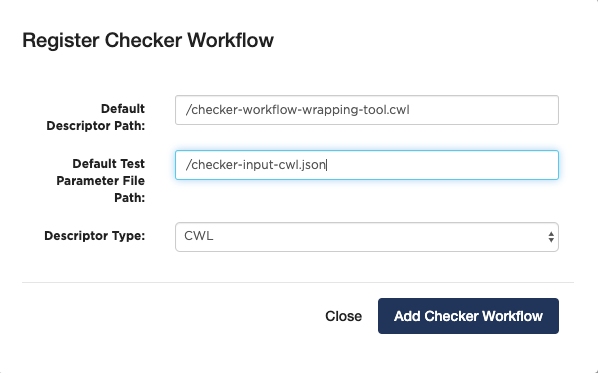
Filling in checker workflow fields.
Once a checker workflow has been added, you can view it by going to the info tab of the parent entry. Where there used to be an add button, there is now the view button. This view button will take you to your checker workflow page.
From the CLI
Run the command dockstore checker --help to see all available
checker workflow commands. For now we are interested in the add command.
Using our example checker workflow, we would run the following:
dockstore checker add --entry quay.io/natalieeo/md5sum-checker \
        --descriptor-type cwl --descriptor-path /checker-workflow-wrapping-tool.cwl \
        --input-parameter-path /checker-input-cwl.json
This will add the checker workflow defined by
/checker-workflow-wrapping-tool.cwl
to the entry quay.io/natalieeo/md5sum-checker.
The descriptor type will default to CWL if none is provided. The default input parameter path will default to the default input parameter path of the parent entry.
Updating a checker workflow
From the UI
Updating a checker workflow and associated versions can be done the same way as with normal workflows. The only difference is that the checker workflow will be nested under the parent tool or workflow under My Tools or My Workflows respectively.
From the CLI
Updating a checker workflow can be done the same way as updating a normal workflow, though there are fewer options.
You can update the default test parameter path and the default
descriptor path. Run dockstore checker update --help for more
information.
Let’s update the default descriptor path in our example to a new value.
dockstore checker update --entry quay.io/natalieeo/md5sum-checker --default-descriptor-path /checker-workflow-wrapping-tool.cwl
This will update the default descriptor path for the checker workflow. Although in this example, the path is already properly set.
Updating versions of a checker workflow is also quite similar to
updating versions of a workflow, but again, there are fewer options. Run
dockstore checker update_version --help for more information.
We can update the master version of our example checker workflow to be
hidden by running
dockstore checker update_version --entry quay.io/natalieeo/md5sum-checker --name master --hidden true
Adding/Removing test input parameter files for a version
From the UI
Updating the test input parameter files associated with a checker workflow version can be done the same way as with normal workflows. The only difference is that to get to the correct page in My Workflows you must go through the parent tool or workflow, in My Tools and My Workflows respectively.
From the CLI
Like most commands, adding/removing test input parameter files to a
checker workflow version can be done in a similar fashion to normal
workflows. No functionality is lost for this command. Run
dockstore checker test_parameter --help for more information.
dockstore checker test_parameter --entry quay.io/natalieeo/md5sum-checker --version master --add /checker-input-cwl.json
This will add the test parameter file /checker-input-cwl.json to the master version of the checker workflow. Though in our example we already added it when we added the checker workflow, so nothing will happen.
Launching a checker workflow
From the CLI
Launching a checker workflow from the CLI should feel very familiar if you have launched tools or workflows on the CLI. You launch it the same as any other entry, however you use the checker mode.
Below is an example of launching a checker workflow for our md5sum example.
dockstore checker launch --entry quay.io/natalieeo/md5sum-checker:master --json test.json
In this example, test.json is a local version of the following file: /checker-input-cwl.json
We also need a local version of the file we are calculating the md5sum for: /md5sum.input
Downloading all relevant files for a checker workflow
It can be useful to have all relevant files for a checker workflow locally. This can be done with the download feature.
From the CLI
The command for this is very simple. Again note that the entry is for the parent entry, and not the checker workflow.
dockstore checker download --entry quay.io/natalieeo/md5sum-checker --version master
This will download the descriptor and any secondary descriptors, while maintaining the correct directory structure.
For Advanced Users
You can interact with checker workflows using TRS. See Checker Workflows and the TRS for more information.