Note
This tutorial is a continuation of Getting Started With Docker. Please complete that tutorial prior to doing this one.
Getting Started with CWL (Legacy)
Tutorial Goals
Learn about the Common Workflow Language (CWL)
Create a basic CWL Tool which uses a Docker image
Run the Tool locally
Describe a sample parameterization of the Tool
Push the Tool onto GitHub
Tutorial Background
This is a legacy version of our “Getting Started with CWL” tutorial. As is mentioned in Overhauling Dockstore Tools, our definition of a tool has changed over time. This tutorial was designed for the older definition, where we required people to associate a tool with a Dockerfile. You can still follow this tutorial to create a valid CWL tool and register it as a GitHub App tool, but we recommend following a simpler version of this tutorial at Getting Started With CWL.
Describe Your Tool in CWL
Now that you have a git repository that includes a Dockerfile, you
have tested it, and are satisfied that your tool works in Docker, the
next step is to create a CWL tool definition
file. This YAML
(or JSON) file describes the inputs, outputs, and Docker image
dependencies for your tool.
It is recommended that you have the following minimum fields:
doc: <description>
id: <id>
label: <label>

cwlVersion: v1.1

dct:creator:
  foaf:name: <name>
Again, we provide an example from the dockstore-tool-bamstats repository:
#!/usr/bin/env cwl-runner
class: CommandLineTool
id: "BAMStats"
label: "BAMStats tool"
cwlVersion: v1.1
doc: |

A Docker container for the BAMStats command. See the [BAMStats](https://bamstats.sourceforge.net/) website for more information.
dct:creator:
  "@id": "https://orcid.org/0000-0002-7681-6415"
  foaf:name: Brian O'Connor
  foaf:mbox: "mailto:briandoconnor@gmail.com"
requirements:
  - class: DockerRequirement
    dockerPull: "quay.io/collaboratory/dockstore-tool-bamstats:1.25-6"
hints:
- class: ResourceRequirement
coresMin: 1
ramMin: 4092 #"the process requires at least 4G of RAM
outdirMin: 512000
inputs:
mem_gb:
type: int
default: 4
doc: "The memory, in GB, for the reporting tool"
inputBinding:
position: 1
bam_input:
type: File
doc: "The BAM file used as input, it must be sorted."
format: "https://edamontology.org/format_2572"
inputBinding:
position: 2
outputs:
bamstats_report:
type: File
format: "https://edamontology.org/format_3615"
outputBinding:
glob: bamstats_report.zip
doc: "A zip file that contains the HTML report and various graphics."
baseCommand: ["bash", "/usr/local/bin/bamstats"]
$namespaces:
dct: https://purl.org/dc/terms/
foaf: https://xmlns.com/foaf/0.1/
Note
The sbg:draft-2 implementation of CWL is optimized for the Seven Bridges cloud-based platform and includes custom extensions. Dockstore does not support sbg:draft-2 CWL tools and workflows, and if you register one, Dockstore will mark the entry as invalid, and you will not be able to publish, run, or launch it on any cloud compute platform. However, we do support CWL v1.0, which defines similar functionality and supersedes the sbg:draft-2 extensions. Seven Bridges also provides instructions for how to transition tools and workflows developed in the Seven Bridges Software Development Kit to GitHub for publishing in Dockstore.
You can see this tool takes two inputs, a parameter to control memory usage and a BAM file (binary sequence alignment file). It produces one output, a zip file, that contains various HTML reports that BAMStats creates.
The CWL is actually recognized and parsed by Dockstore (when we register
this later). By default it recognizes Dockstore.cwl but you can
customize this if you need to. One of the most important items below is
the CWL
version.
You should label your CWL with the version you are using so that CWL
tools that cannot run this version will error out appropriately. Our
tools have been tested with v1.0 and v1.1.
class: CommandLineTool
id: "BAMStats"
label: "BAMStats tool"
cwlVersion: v1.1
doc: |

A Docker container for the BAMStats command. See the [BAMStats](https://bamstats.sourceforge.net/) website for more information.
In the code above you can see how to have an extended doc (description) which is quite useful.
dct:creator:
"@id": "https://orcid.org/0000-0002-7681-6415"
foaf:name: Brian O'Connor
foaf:mbox: "mailto:briandoconnor@gmail.com"
This section includes the tool author referenced by Dockstore. It is open to your interpretation whether that is the person that registers the tool, the person who made the Docker image, or the developer of the original tool. I’m biased towards the person that registers the tool since they are likely to be the primary contact when asking questions about how the tool was setup.
Dockstore uses the authorship information and description from the descriptor file to populate metadata for tools.
Note
If no description is defined in the descriptor file, the README from the corresponding Git repository is used.
You can register for an ORCID (a digital identifer for researchers) or use an email address for your id.
requirements:
- class: DockerRequirement
dockerPull: "quay.io/collaboratory/dockstore-tool-bamstats:1.25-6"
This section links the Docker image used for this CWL. Notice it’s
exactly the same as the -t you used when building your image.
hints:
  - class: ResourceRequirement
    coresMin: 1
    ramMin: 4092 # the process requires at least 4G of RAM
    outdirMin: 512000
This may or may not be honoured by the tool calling this CWL, but at least it gives you a place to declare computational requirements.
inputs:
  mem_gb:
    type: int
    default: 4
    doc: "The memory, in GB, for the reporting tool"
    inputBinding:
      position: 1

  bam_input:
    type: File
    doc: "The BAM file used as input, it must be sorted."
    format: "https://edamontology.org/format_2572"
    inputBinding:
      position: 2
This is one of the items from the inputs section. Notice a few things:
The
bam_input:matches withbam_inputin the sample parameterization JSON (shown in the next section assample_configs.local.json).You can control the position of the variable.
It can have a type (int or File here), and, for tools that require a prefix (
--prefix) before a parameter you can use theprefix: keyin the inputBindings section.I’m using the
formatfield to specify a file format via the EDAM ontology.
outputs:
  bamstats_report:
    type: File
    format: "https://edamontology.org/format_3615"
    outputBinding:
      glob: bamstats_report.zip
    doc: "A zip file that contains the HTML report and various graphics."
Finally, the outputs section defines the output files. In this case, it
says in the current working directory there will be a file called
bamstats_report.zip. When running this tool with CWL tools the file
will be copied out of the container to a location you specify in your
parameter JSON file. We’ll walk though an example in the next section.
Finally, the baseCommand is the actual command that will be
executed. In this case, it’s the wrapper script I wrote for bamstats.
baseCommand: ["bash", "/usr/local/bin/bamstats"]
The CWL standard is continuing to evolve and hopefully we will see new features, like support for EDAM ontology terms, in future releases. In the mean time, the Gitter chat is an active community to help drive the development of CWL in positive directions and we recommend tool authors make their voices heard.
Testing Locally
So at this point, you’ve created a Docker-based tool and have described how to call that tool using CWL. Let’s test running the BAMStats using the Dockstore command line and descriptor, rather than just directly calling it via Docker. This will test that the CWL correctly describes how to run your tool.
The first thing I’ll do is setup the Dockstore CLI locally. This will have me install all of the dependencies needed to run the Dockstore CLI on my local machine. Make sure to install cwltool as well.
Next thing I’ll do is create a completely local dataset and JSON parameterization file:
$> wget ftp://ftp.1000genomes.ebi.ac.uk/vol1/ftp/phase3/data/NA12878/alignment/NA12878.chrom20.ILLUMINA.bwa.CEU.low_coverage.20121211.bam
$> mv NA12878.chrom20.ILLUMINA.bwa.CEU.low_coverage.20121211.bam /tmp/
This downloads to my current directory and then moves to /tmp. I
could choose another location, it really doesn’t matter, but we need the
full path when dealing with the parameter JSON file. I’m using a sample
I checked in already: sample_configs.local.json.
{
    "bam_input": {
        "class": "File",
        "format": "https://edamontology.org/format_2572",
        "path": "/tmp/NA12878.chrom20.ILLUMINA.bwa.CEU.low_coverage.20121211.bam"
    },
    "bamstats_report": {
        "class": "File",
        "path": "/tmp/bamstats_report.zip"
    }
}
Tip
The Dockstore CLI can handle inputs with HTTPS, FTP, and S3 URLs but that’s beyond the scope of this tutorial.
You can see in the above I give the full path to the input under
bam_input and full path to the output bamstats_report.
At this point, let’s run the tool with our local inputs and outputs via the JSON config file:
$> dockstore tool launch --local-entry Dockstore.cwl --json sample_configs.local.json
   Creating directories for run of Dockstore launcher at: ./datastore//launcher-9d9c9bf1-7094-4a21-b2a3-1b3ad330a0a3
   Provisioning your input files to your local machine
   Downloading: #bam_input from /tmp/NA12878.chrom20.ILLUMINA.bwa.CEU.low_coverage.20121211.bam into directory: /media/dyuen/Data/large_volume/dockstore_tools/dockstore-tool-bamstats/./datastore/launcher-9d9
   c9bf1-7094-4a21-b2a3-1b3ad330a0a3/inputs/78a05989-6978-45b0-b6e9-5f81e7aa34ad
   Calling out to cwltool to run your tool
   Executing: cwltool --enable-dev --non-strict --outdir /media/dyuen/Data/large_volume/dockstore_tools/dockstore-tool-bamstats/./datastore/launcher-9d9c9bf1-7094-4a21-b2a3-1b3ad330a0a3/outputs/ --tmpdir-pre
   fix /media/dyuen/Data/large_volume/dockstore_tools/dockstore-tool-bamstats/./datastore/launcher-9d9c9bf1-7094-4a21-b2a3-1b3ad330a0a3/tmp/ --tmp-outdir-prefix /media/dyuen/Data/large_volume/dockstore_tools
   /dockstore-tool-bamstats/./datastore/launcher-9d9c9bf1-7094-4a21-b2a3-1b3ad330a0a3/working/ /media/dyuen/Data/large_volume/dockstore_tools/dockstore-tool-bamstats/Dockstore.cwl /media/dyuen/Data/large_vol
   ume/dockstore_tools/dockstore-tool-bamstats/./datastore/launcher-9d9c9bf1-7094-4a21-b2a3-1b3ad330a0a3/workflow_params.json
   /usr/local/bin/cwltool 1.0.20170217172322
   Resolved '/media/dyuen/Data/large_volume/dockstore_tools/dockstore-tool-bamstats/Dockstore.cwl' to 'file:///media/dyuen/Data/large_volume/dockstore_tools/dockstore-tool-bamstats/Dockstore.cwl'
   [job Dockstore.cwl] /media/dyuen/Data/large_volume/dockstore_tools/dockstore-tool-bamstats/datastore/launcher-9d9c9bf1-7094-4a21-b2a3-1b3ad330a0a3/working/BHsHWq$ docker \
       run \
       -i \
       --volume=/media/dyuen/Data/large_volume/dockstore_tools/dockstore-tool-bamstats/./datastore/launcher-9d9c9bf1-7094-4a21-b2a3-1b3ad330a0a3/inputs/78a05989-6978-45b0-b6e9-5f81e7aa34ad/NA12878.chrom20.IL
   LUMINA.bwa.CEU.low_coverage.20121211.bam:/var/lib/cwl/stgc0a728c7-a8c0-44d3-be58-031fd656eb96/NA12878.chrom20.ILLUMINA.bwa.CEU.low_coverage.20121211.bam:ro \
       --volume=/media/dyuen/Data/large_volume/dockstore_tools/dockstore-tool-bamstats/datastore/launcher-9d9c9bf1-7094-4a21-b2a3-1b3ad330a0a3/working/BHsHWq:/var/spool/cwl:rw \
       --volume=/media/dyuen/Data/large_volume/dockstore_tools/dockstore-tool-bamstats/datastore/launcher-9d9c9bf1-7094-4a21-b2a3-1b3ad330a0a3/tmp/Z8umDA:/tmp:rw \
       --workdir=/var/spool/cwl \
       --read-only=true \
       --user=1001 \
       --rm \
       --env=TMPDIR=/tmp \
       --env=HOME=/var/spool/cwl \
       quay.io/collaboratory/dockstore-tool-bamstats:1.25-7 \
       bash \
       /usr/local/bin/bamstats \
       4 \
       /var/lib/cwl/stgc0a728c7-a8c0-44d3-be58-031fd656eb96/NA12878.chrom20.ILLUMINA.bwa.CEU.low_coverage.20121211.bam
...
        [job Dockstore.cwl] completed success
        Final process status is success

Saving copy of cwltool stdout to: /media/dyuen/Data/large_volume/dockstore_tools/dockstore-tool-bamstats/./datastore/launcher-9d9c9bf1-7094-4a21-b2a3-1b3ad330a0a3/outputs/cwltool.stdout.txt
Saving copy of cwltool stderr to: /media/dyuen/Data/large_volume/dockstore_tools/dockstore-tool-bamstats/./datastore/launcher-9d9c9bf1-7094-4a21-b2a3-1b3ad330a0a3/outputs/cwltool.stderr.txt

Provisioning your output files to their final destinations
Uploading: #bamstats_report from /media/dyuen/Data/large_volume/dockstore_tools/dockstore-tool-bamstats/./datastore/launcher-9d9c9bf1-7094-4a21-b2a3-1b3ad330a0a3/outputs/bamstats_report.zip to : /tmp/bams
tats_report.zip
[##################################################] 100%
So that’s a lot of information, but you can see the process was a success. We get output from the command we ran and also see the file being moved to the correct output location:
$> ls -lth /tmp/bamstats_report.zip
-rw-rw-r-- 1 ubuntu ubuntu 32K Jun 16 02:14 /tmp/bamstats_report.zip
The output looks fine, just what we’d expect.
So what’s going on here? What’s the Dockstore CLI doing? It can best be summed up with this image:
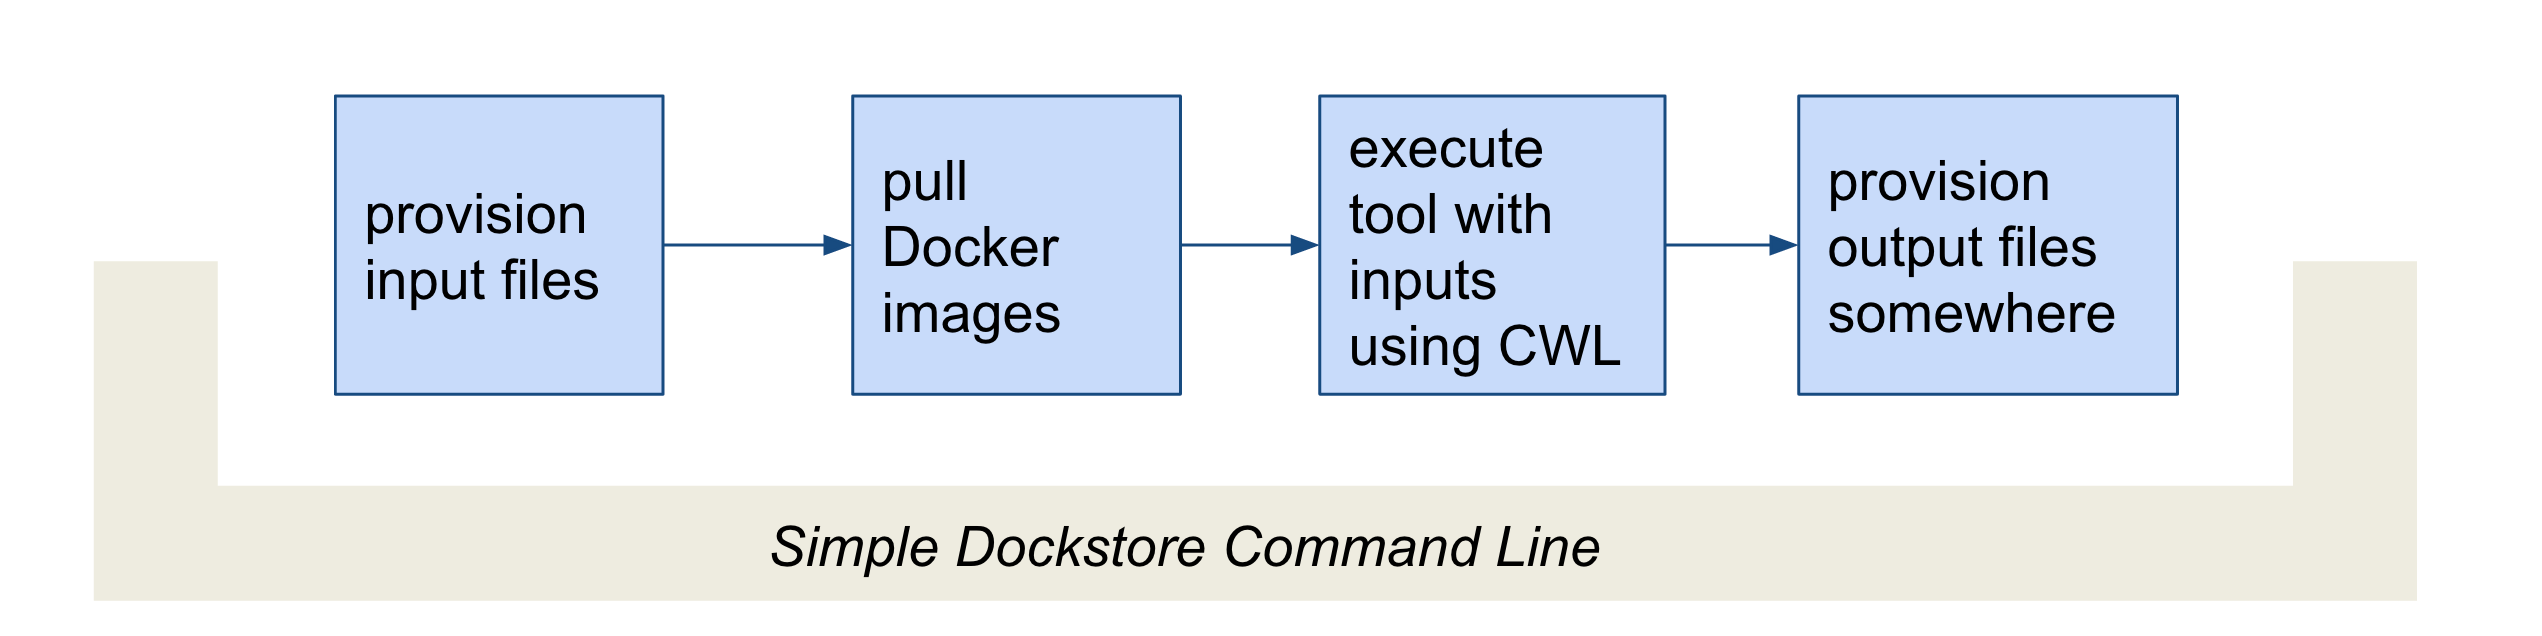
Lifecycle
The command line first provisions files. In our case, the files were
local so no provisioning was needed. But as the Tip above mentioned,
these can be various URLs. After provisioning the docker image is pulled
and ran via the cwltool command line. This uses the
Dockerfile.cwl and parameterization JSON file
(sample_configs.local.json) to construct the underlying
docker run command. Finally, the Dockstore CLI provisions files
back. In this case it’s just a file copy to /tmp/bamstats_report.zip
but it could copy the result to a destination in S3 for example.
Tip
You can use --debug to get much more information during
this run, including the actual call to cwltool (which can be super
helpful in debugging).
Tip
The dockstore CLI automatically creates a datastore
directory in the current working directory where you execute the command
and uses it for inputs/outputs. It can get quite large depending on the
tool/inputs/outputs being used. Plan accordingly, e.g. execute the
dockstore CLI in a directory located on a partition with sufficient
storage.
Adding a Test Parameter File
We are able to register the above input parameterization of the tool into Dockstore so that users can see and test an example with our tool. Users can manually add test parameter files for a given tool tag or workflow version through both the command line and the versions tab in the UI.
Tip
Make sure that any required input files are given as publically accessible URLs so that a user can run the example successfully.
Releasing on GitHub
At this point, we’ve successfully created our tool in Docker, tested it,
written a workflow language descriptor that describes how to run it, and
tested running this via the Dockstore command line. All of this work has
been done locally; so if we encounter problems along the way, it is fast
to perform debug cycles. At this point, we’re confident that the tool is
bug free and ready to share with others. It’s time to release
1.25-6_1.1
Releasing will tag your GitHub repository with a version tag so you can
always get back to this particular release. I’m going to use the tag
1.25-6_1.1 which I’ll need to update the Docker image tag in
my CWL/WDL/Nextflow file. Note that if you’re following the tutorial
using a forked version of the bamstats repo, your organization name
should be different. GitHub makes it very easy to release:
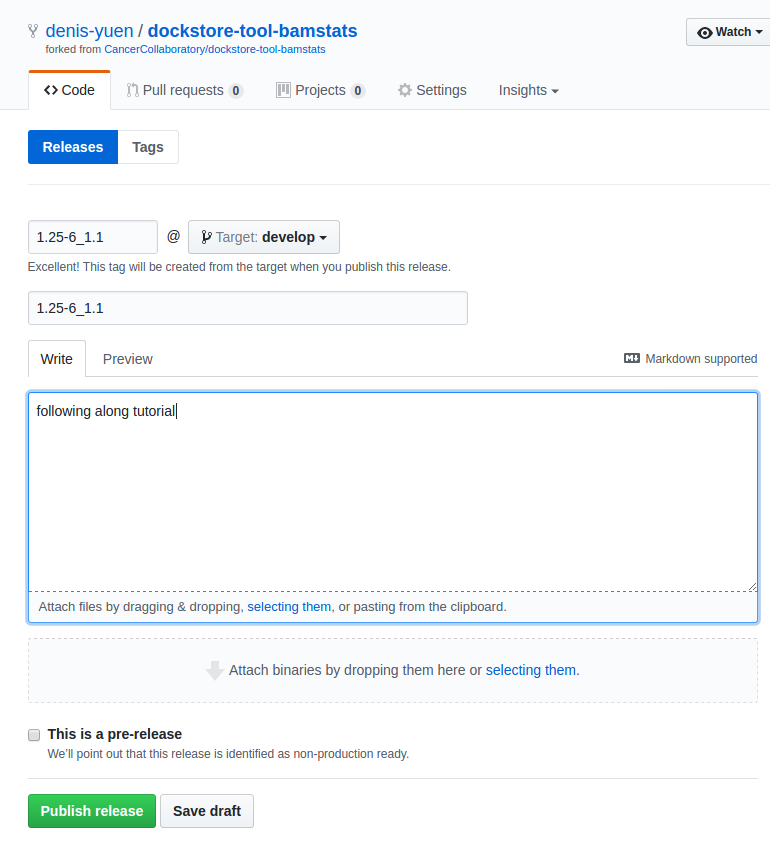
Release
I click on “releases” in my forked version of the GitHub project page and then follow the directions to create a new release. Simple as that!
Building on Quay.io
Now that you’ve perfected the Dockerfile, built the image on your
local host, tested running the Docker container and tool packaged
inside, and have released this version on GitHub, it’s time to push the
image to a place where others can use it. For this you can use Docker
Hub or GitLab but we prefer Quay.io since it
integrates really nicely with Dockstore.
You can manually docker push the image you have already built but
the most reliable and transparent thing you can do is link your GitHub
repository (and the Dockerfile contained within) to Quay.io. This will
cause Quay to automatically build the Docker image every time there is a
change.
Log onto Quay.io now and setup a new repository (click the “+” icon).
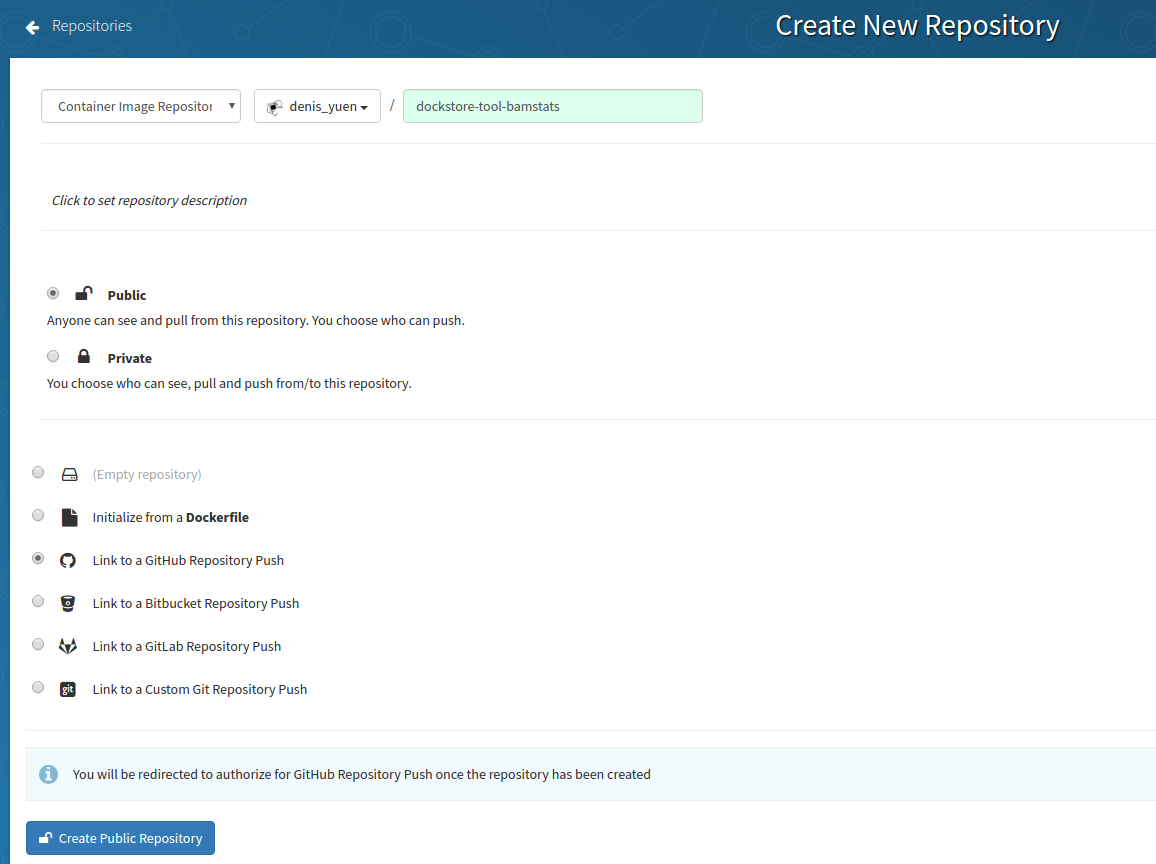
New Quay Repo
For your sanity, you should match the name to what you were using
previously. So in this case, it’s my username then the same repo name as
in GitHub denis-yuen/dockstore-tool-bamstats. Also, Dockstore will
only work with Public repositories currently. Notice I’m selecting
“Link to a GitHub Repository Push.” This is because we want Quay to
automatically build our Docker image every time we update the repository
on GitHub. Very slick!
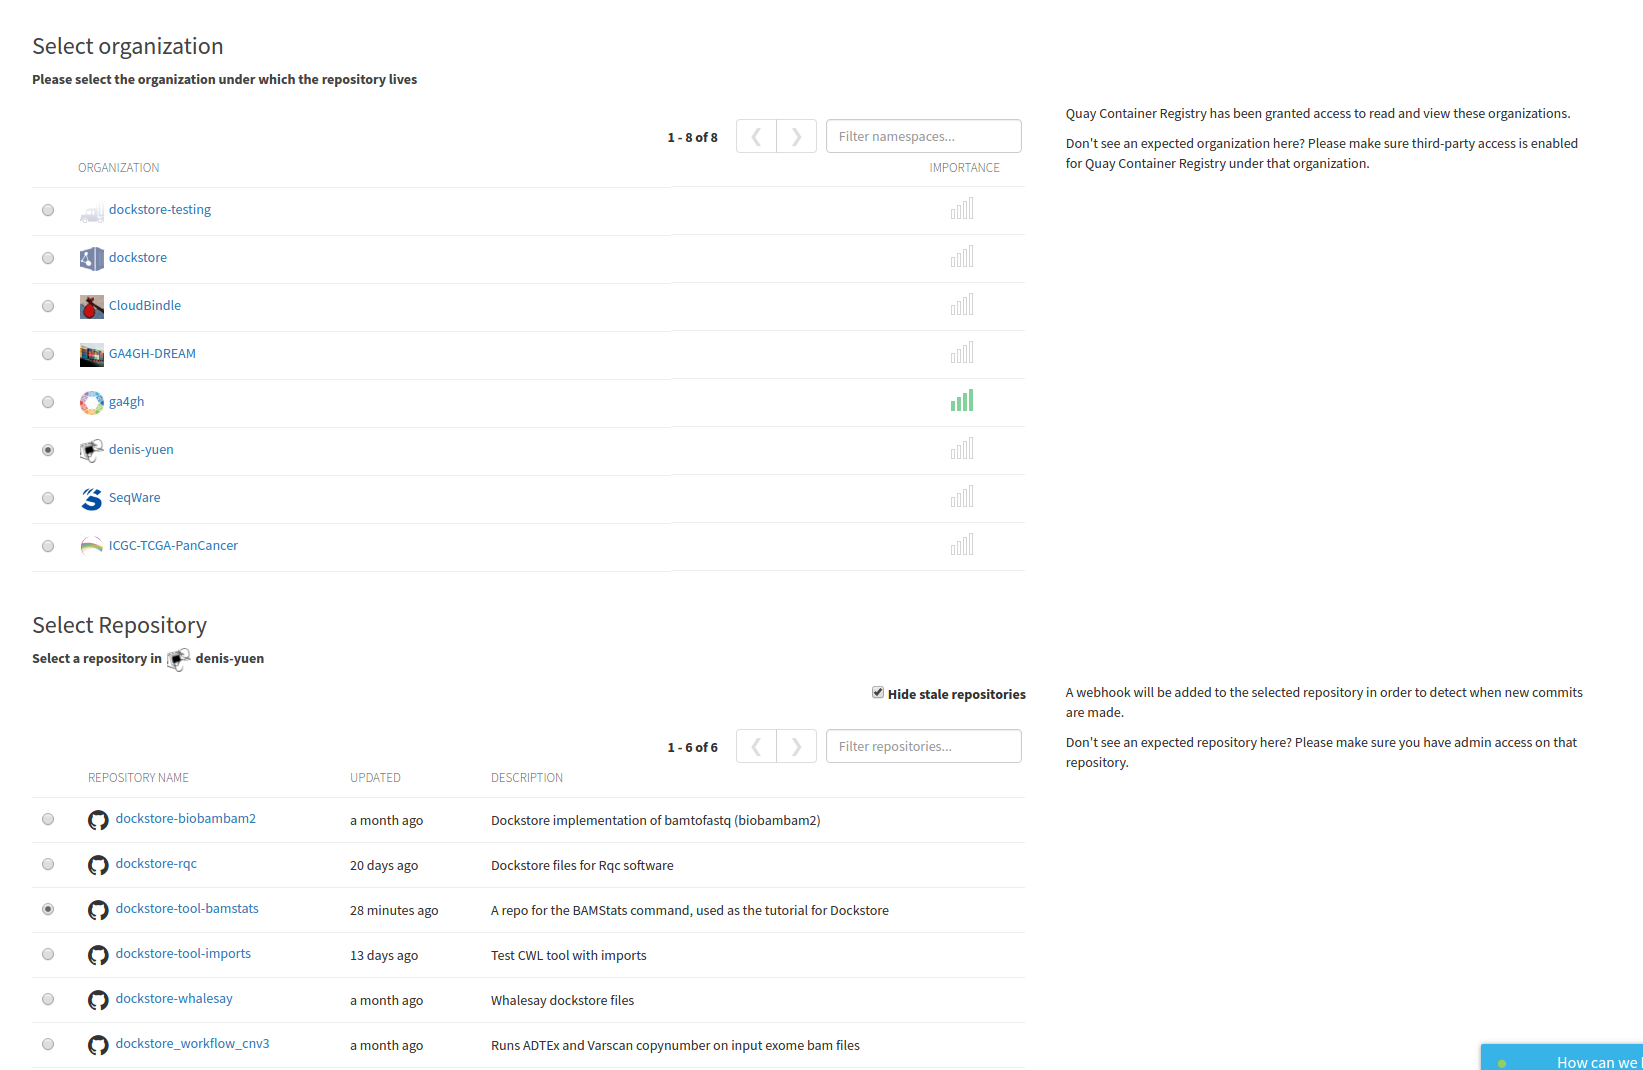
Build Trigger
Click through to select the organization and repo that will act as the
source for your image. Here I select the GitHub repo for
denis-yuen/dockstore-tool-bamstats but this should be the username
or organization you used in your tutorial run-through.
It will then ask if there are particular branches you want to build; I typically just let it build everything.
So every time you do a commit to your GitHub repo, Quay automatically builds and tags a Docker image. If this is overkill for you, consider setting up a regular expression to trigger builds at this step.
Build Trigger
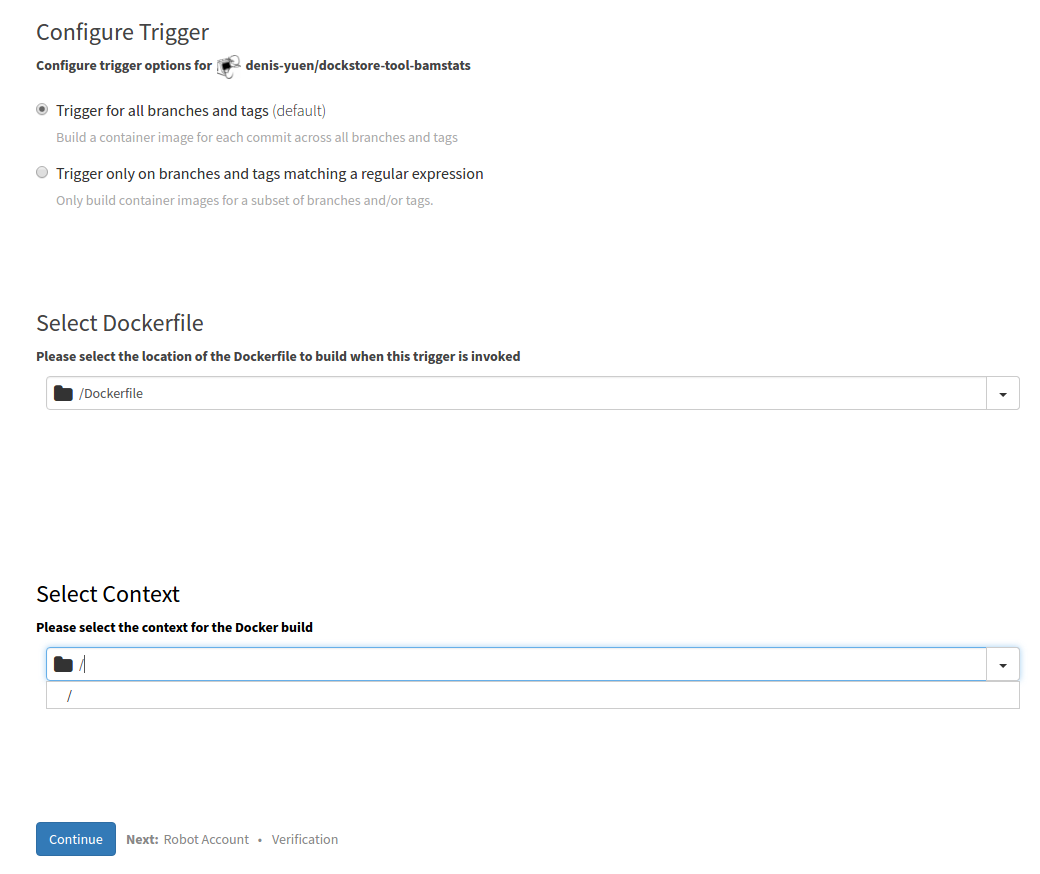
It will also ask you where your Dockerfile is located and where your build context is (normally the root).
At this point, you can confirm your settings and “Create Trigger” followed by “Run Trigger Now” to actually perform the initial build of the Docker images. You’ll need to click on the little gear icon next to your build trigger to accomplish this.
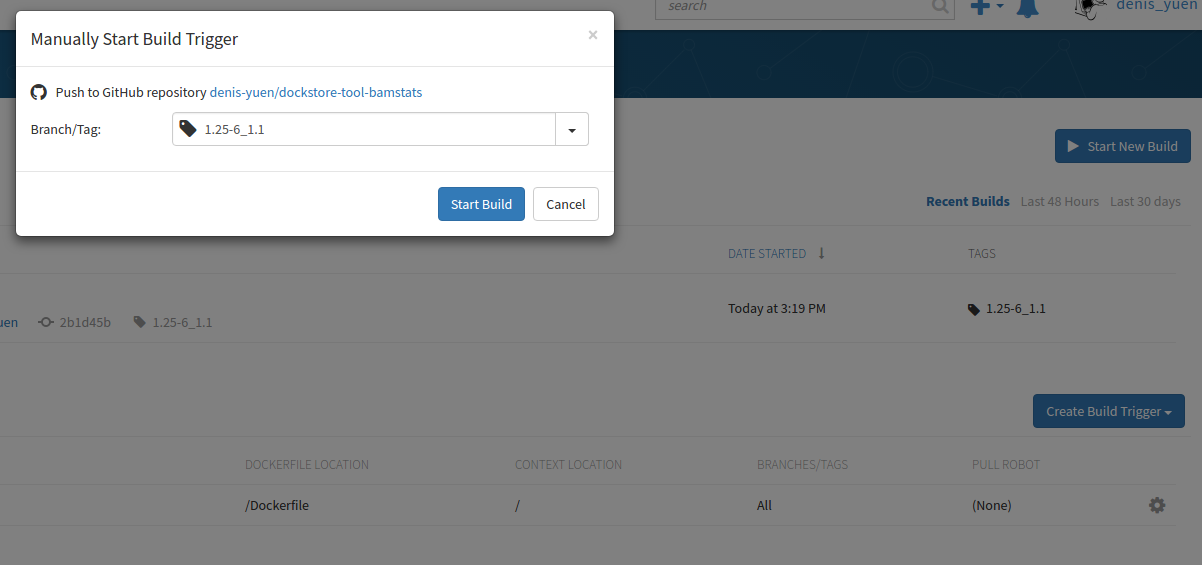
Manual Trigger
Manually trigger it with a version name of 1.25-6_1.1 for this
tutorial. Normally, I let the build trigger build a new tag for each new
release on GitHub. “latest” on Quay.io is built any time I check-in on
any branch. This can be useful for development but is discouraged in
favour of a tagged version number for formal releases of your tool.
In my example, I should see a 1.25-6_1.1 listed for this Quay.io
Docker repository:
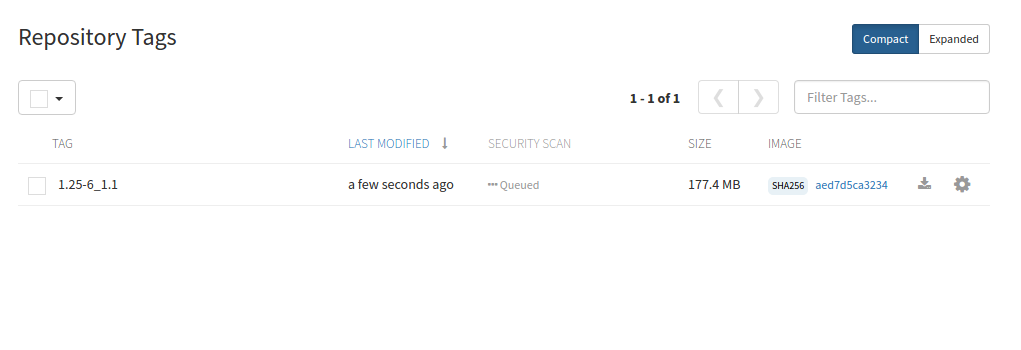
Build Tags
And I do, so this Docker image has been built successfully by Quay and is ready for sharing with the community.